Home | naftalyava.com
Debugging Memory Leaks with eBPF
1. Introduction
I recently had to track down memory leaks in a poorly written legacy application. Traditional tools like Valgrind weren’t helpful because I needed to attach to a running executable and monitor memory allocations between two specific points in time. To solve this, I used eBPF (extended Berkeley Packet Filter) and uprobes to track every malloc and free call during that period, capturing all memory operations and identifying potential leaks.
Using uprobes, I hooked into functions like malloc and free in libc, capturing memory allocation events at the user-space level. By attaching eBPF programs to these probes, I recorded each allocation and deallocation in real time, efficiently tracking memory usage. To obtain call stacks for the leaks, I compiled the program with the -g and -fno-omit-frame-pointer flags.
This approach provided insights into the already running application that traditional tools couldn’t offer. In this post, I’ll show how eBPF and uprobes can be combined to trace memory allocations and detect leaks. You can find the full implementation, including all code and setup files, on my GitHub repo.
2. Prerequisites
Before diving into the code, let’s go over some essential concepts to understand the foundation of this approach.
libc
libc is the standard C library on Linux, providing essential memory management functions such as malloc (for allocating memory) and free (for deallocating memory). Most applications rely on libc for these operations, making it the perfect target for tracking memory usage. When a user-space program calls malloc, it interacts with libc, which handles the underlying memory requests and communicates with the kernel as needed. By hooking into malloc and free, we can effectively monitor memory allocation and deallocation events in real-time.
uprobes
uprobes (user-space probes) allow us to dynamically attach to specific functions within user-space binaries, such as malloc and free in libc. By doing so, we can monitor each time these functions are called, making it possible to track memory allocations and deallocations accurately. The key advantage of uprobes is that they don’t require any modification to the target application’s code or recompilation, making them ideal for real-time debugging.
3. eBPF and Uprobes: The Foundation for User-Space Tracing
To detect memory leaks in a user-space program, we need a way to track each memory allocation and deallocation function call in libc over a specified time period. By combining eBPF with uprobes, we can dynamically trace these events in user-space applications with minimal performance impact, capturing every malloc and free call efficiently.
What is eBPF?
eBPF (extended Berkeley Packet Filter) is a powerful feature in the Linux kernel that allows developers to run custom, sandboxed programs within the kernel and user space. eBPF enables advanced monitoring, tracing, networking, and security capabilities without modifying kernel code or impacting system stability. It operates in three main areas:
-
Kernel Tracing: eBPF can attach to kernel functions, allowing you to trace system calls, monitor kernel events, and gather performance metrics.
Example Usage: Using kprobes to profile system call performance or monitor file operations.
-
User-Space Tracing: eBPF can attach to functions in user-space applications, facilitating detailed application-level tracing and debugging without altering the application code.
Example Usage: Utilizing uprobes to profile application performance or debug memory leaks.
-
Networking (XDP): eBPF programs can run in the XDP (eXpress Data Path), processing incoming network packets before they reach the kernel’s network stack. This allows for high-performance packet filtering, load balancing, and DDoS mitigation with minimal latency.
Example Usage: Implementing custom firewalls or high-speed packet processing using XDP.
Examples of eBPF Usage:
-
Observability: Tools like bpftrace and bcc leverage eBPF for deep system and application observability, providing insights into performance bottlenecks and system behavior.
-
Cilium: A networking and security solution for Kubernetes that uses eBPF to provide features like load balancing, network policies, and transparent encryption without requiring changes to application code.
-
Debugging and Profiling: eBPF allows developers to profile applications and the kernel in real time, helping to identify performance issues and debug complex problems efficiently.
-
Security Monitoring: eBPF can be used to implement intrusion detection systems, monitor system calls for suspicious activity, and enforce security policies at the kernel level.
eBPF’s efficiency and versatility make it an essential tool for modern Linux system administration, offering capabilities that extend across multiple domains including performance tuning, networking, security, and application debugging.
Understanding Uprobes
uprobes (user-space probes) provide a way to attach probes to specific functions or addresses in user-space applications. When a uprobe is attached to a function, it triggers every time the function is called. In our case, we’ll attach uprobes to malloc and free in libc. This setup allows us to capture every time the application allocates or deallocates memory through these functions, giving us the exact data needed to trace memory usage and detect leaks.
To list available uprobes in libc, we can use a bpftrace command like this:
sudo bpftrace -l 'uprobe:/lib/x86_64-linux-gnu/libc.so.6:*'
In this list, malloc and free are essential functions for tracking memory allocations and deallocations. By attaching uprobes to these, we can capture allocation and deallocation events in real-time, monitoring each memory operation within libc.
Combining eBPF with Uprobes
When combined, eBPF and uprobes allow us to dynamically trace memory allocations and deallocations across a program’s lifecycle. By attaching uprobes to malloc and free, we can write eBPF programs that track memory allocation events, log the requested sizes, capture stack traces, and record the memory addresses allocated.
This combination is efficient, non-intrusive, and allows us to capture all allocations and deallocations within any user-space program. Here’s how it works:
malloc Entry: Each time malloc is called, our eBPF program attached to malloc via uprobes captures the allocation size.malloc Exit: When malloc completes, the eBPF program records the allocated memory address and captures a stack trace to pinpoint where in the code the allocation occurred.free Entry: When free is called, our eBPF program attached to free via uprobes deletes the memory allocation entry from our tracking map.
4. Writing the eBPF Program
To trace memory allocations and deallocations, we need an eBPF program that captures information from malloc and free. This program will consist of maps to store allocation information and probes to capture memory allocation and deallocation events in real-time.
Let’s break down the main components of this eBPF program.
Map Definitions
In eBPF, maps are used to store data that our program collects, making it accessible to user-space code. For our memory leak detector, we define two maps:
allocs Map: This map tracks each active memory allocation, using the memory address as the key and a structure with allocation details as the value.stack_traces Map: This map stores stack traces for each allocation, which allows us to track the source of each memory allocation and determine where in the code each allocation originated.
Here’s how we define these maps in our eBPF program:
struct {
    __uint(type, BPF_MAP_TYPE_HASH);
    __uint(max_entries, 10240);
    __type(key, u64); // Memory address
    __type(value, struct alloc_info_t); // Allocation information
} allocs SEC(".maps");

struct {
    __uint(type, BPF_MAP_TYPE_STACK_TRACE);
    __uint(max_entries, 10240);
    __uint(key_size, sizeof(u32));
    __uint(value_size, MAX_STACK_DEPTH * sizeof(u64));
} stack_traces SEC(".maps");
The allocs map uses the allocated memory address as the key and stores details like the allocation size and stack trace ID in a custom struct called alloc_info_t. The stack_traces map stores user-space stack traces, helping us identify where each allocation originates in the code.
Defining the Probes
Now, let’s look at the probes attached to malloc and free. These probes capture information at each call to malloc and free to record allocations and detect when memory is freed.
malloc_enter:
- This probe captures the size of the memory allocation requested in
malloc.
- We use
PT_REGS_PARM1(ctx) to retrieve the first parameter passed to malloc, which is the size of the memory to be allocated.
SEC("uprobe/malloc_enter")
int malloc_enter(struct pt_regs *ctx) {
    u64 pid_tgid = bpf_get_current_pid_tgid();
    u64 size = PT_REGS_PARM1(ctx);

    // Save the size in a map indexed by PID/TID
    bpf_map_update_elem(&allocs, &pid_tgid, &size, BPF_ANY);
    return 0;
}
malloc_exit:
- This probe runs after
malloc completes, capturing the returned memory address and associating it with the allocation size stored in malloc_enter.
- Additionally, we capture the stack trace at this point to help trace the source of each allocation.
SEC("uretprobe/malloc_exit")
int malloc_exit(struct pt_regs *ctx) {
    u64 pid_tgid = bpf_get_current_pid_tgid();
    u64 *size_ptr = bpf_map_lookup_elem(&allocs, &pid_tgid);
    if (!size_ptr) return 0;

    u64 addr = PT_REGS_RC(ctx);
    if (addr == 0) {
        bpf_map_delete_elem(&allocs, &pid_tgid);
        return 0;
    }

    int stack_id = bpf_get_stackid(ctx, &stack_traces, BPF_F_USER_STACK);
    struct alloc_info_t info = {.size = *size_ptr, .stack_id = stack_id};

    bpf_map_update_elem(&allocs, &addr, &info, BPF_ANY);
    bpf_map_delete_elem(&allocs, &pid_tgid);

    return 0;
}
free_enter:
- This probe removes an allocation entry from the
allocs map when free is called, ensuring we only track active allocations.
- We retrieve the pointer being freed using
PT_REGS_PARM1(ctx) and delete the corresponding entry from the allocs map.
SEC("uprobe/free_enter")
int free_enter(struct pt_regs *ctx) {
    u64 addr = PT_REGS_PARM1(ctx);
    bpf_map_delete_elem(&allocs, &addr);
    return 0;
}
Each of these probes plays a specific role:
malloc_enter records the allocation size when malloc is called.malloc_exit captures the allocated memory address and stack trace once malloc completes.free_enter cleans up allocations from the map when free is called.
Compilation
Disclaimer: This code has only been tested on kernel version 6.8.0-47-generic running on Ubuntu 22.04.
My GitHub repo includes a Makefile that automates the compilation of this eBPF C code. To compile, you simply need to run:
This will create an object file (ebpf.o) that contains the compiled eBPF code. This object file is then loaded by the Go program, which we’ll discuss next.
By defining these probes and maps, we can track all memory allocations and deallocations within a program. In the next section, we’ll look at how to implement a Go program that loads this eBPF code, attaches uprobes, and periodically checks for potential memory leaks.
5. Implementing the Go Program
With our eBPF program ready, the next step is to create a user-space application that loads it, attaches the probes, and periodically checks for memory leaks. Additionally, at the end of the run, the application will print all allocations that were not freed. To achieve this, we’ll utilize ebpf-go by Cilium, a robust library for interacting with eBPF programs in Go. You can find the ebpf-go documentation here.
The Go program will handle the following tasks:
- Loading the eBPF Object File: Load the compiled eBPF bytecode into the kernel.
- Attaching Uprobes: Attach
uprobes to the malloc and free functions in libc, enabling the eBPF program to monitor memory allocations and deallocations.
- Scanning for Memory Leaks: Periodically scan the tracked allocations to identify any potential memory leaks.
- Reporting Leaks: At the end of the execution, print all allocations that were not freed, providing a clear view of memory leaks.
Let’s dive into each of these components in detail.
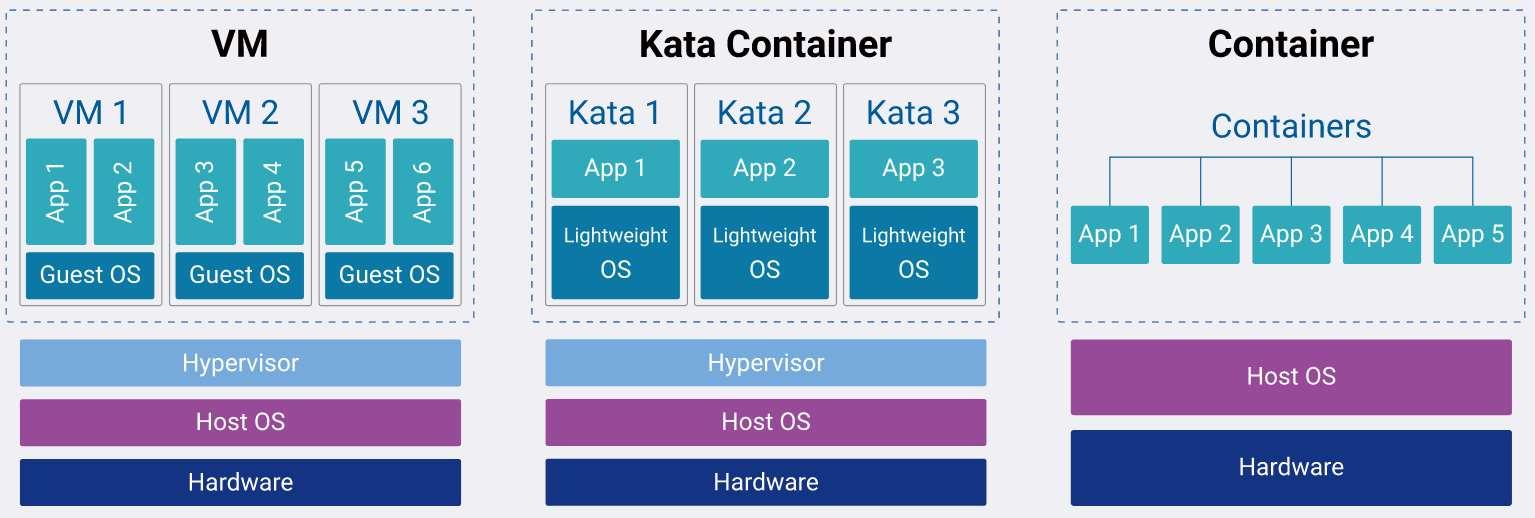
Kata Containers: When Containers and Virtual Machines Make a Baby
In March this year, we celebrated the 10-year anniversary of Docker, a technology that revolutionized the way we build and deploy applications. The adoption was explosive—so explosive that it’s extremely difficult to find a developer today who isn’t using containerization technology in some capacity.
The next evolution of containerization technology, Kata Containers, is still relatively unknown. To fully grasp the significance of its emergence, it’s essential to take a journey back to the roots of virtualization technology.
Xen Hypervisor & Hardware-Assisted Virtualization
In simple terms, virtualization allows a single physical computer to be divided into multiple virtual computers. This magic is achieved through a piece of software known as the hypervisor.
While the concept of virtualization dates to the late 1960s, significant advancements were made in the mid-2000s. In 2005/2006, Intel and AMD introduced hardware-assisted virtualization with VT-x and AMD-V technologies for the x86 architecture. This enabled virtual machines (VMs) to operate with minimal performance overhead. That same year, the Xen hypervisor incorporated VT-x and AMD-V, setting the stage for the rapid growth of public cloud platforms like AWS, GCP, Azure, and OCI.
As businesses increasingly adopted cloud services, the need for heightened security became paramount, especially when different clients shared the same physical hardware for their VMs. Hypervisors leverage hardware capabilities to ensure distinct separation between VMs. This means that even if one client’s VM experiences a crash or failure, others remain unaffected.
Going a step further, AMD introduced Secure Encrypted Virtualization (SEV) technology in 2017, enhancing VM isolation. With SEV, not only is data protected from other VMs, but it also introduces a “zero-trust” approach towards the hypervisor itself, ensuring that even the hypervisor cannot access encrypted VM data. This offers an added layer of protection in a shared-resource environment.
The Emergence of Containers
Virtual machines streamlined application deployment by abstracting the underlying hardware. However, they introduced new challenges. For instance, there was still the responsibility of maintaining the operating system (OS) on which the application ran. This involved configuring, updating, and patching security vulnerabilities. Furthermore, installing and configuring all the application’s dependencies remained a tedious task.
Containerization emerged as a solution to these challenges. Containers package the application together with its environment, dependencies, and configurations, ensuring consistency across deployments.
Recognizing the need to simplify OS maintenance further, AWS launched Fargate in 2017. With Fargate, developers can run containers on the cloud without the overhead of OS management. As the popularity of containerized applications surged, orchestrating these containers at scale became a challenge. This was effectively addressed by technologies like Kubernetes, which automate the deployment, scaling, and management of containerized applications.
Building on the Foundations
Having understood the intricate evolution of hardware capabilities over four decades, we appreciate how instrumental these advancements were in enhancing both performance and security for virtual machines. These developments have made it feasible to run multiple virtual machines on a single physical host without significant performance overhead while also maintaining strong isolation between them.
However, when it comes to containers, a different approach is taken. Unlike virtual machines, which rely heavily on these hardware-based virtualization features, containers don’t create whole separate virtualized hardware environments. Instead, they function within the same OS kernel and rely on built-in features of that kernel for their isolation.
At the heart of container isolation is a mechanism called namespaces. Introduced in the Linux kernel, namespaces effectively provide isolated views of system resources to processes. There are several types of namespaces in Linux, each responsible for isolating a particular set of system resources. For example:
- PID namespaces ensure that processes in different containers have separate process ID spaces, preventing them from seeing or signaling processes in other containers.
- Network namespaces give each container its own network stack, ensuring they can have their own private IP addresses and port numbers.
- Mount namespaces allow containers to have their own distinct set of mounted file systems.
And so on, for user, UTS, cgroup, and IPC namespaces.
The beauty of namespaces is their ability to provide a lightweight, efficient, and rapid isolation mechanism. This makes it possible for containers to start almost instantaneously and use minimal overhead, all while operating in isolated environments.
However, it’s essential to understand that while namespaces provide a degree of isolation, they don’t offer the same robust boundary that a virtual machine does with its separate kernel and often hardware-assisted barriers.
Kata Containers is Born
Building on the foundation of virtual machines and containers, Kata Containers emerged as a solution that seamlessly fuses the strengths of both worlds.
Traditional containers, with their reliance on kernel namespaces, bring unparalleled agility and efficiency. They can be spun up in fractions of a second and have minimal overhead, making them perfect for dynamic, scalable environments. On the other hand, virtual machines, backed by decades of hardware innovation, offer a more robust isolation boundary, giving a heightened sense of security, especially in multi-tenant environments.
Kata Containers seeks to bridge the gap between these two paradigms. At its core, Kata Containers provides a container runtime that integrates with popular container platforms like Kubernetes. But instead of relying solely on the kernel’s namespace for isolation, Kata Containers launches each container inside its lightweight virtual machine.
The below diagram demonstrates the difference between VM, Kata Containers, and conventional containers.
Introduction
Today, we’re addressing a common challenge for home lab users: how to make the most of our server with multiple cores and significant memory. Whether you’re running a Plex server, Kubernetes clusters, or VMs for development, a frequent issue is that these VMs are often hidden behind NAT, limiting their accessibility from other devices on your network.
To solve this, we will use two open source projects:
- QEMU/KVM: This hypervisor and virtual machine monitor lets us create and manage VMs.
- Open vSwitch (OVS): This is a software-based switch that enables more complex network configurations in virtualized environments than traditional switches.
Understanding the Problem
The main issue is that VMs operating behind NAT are not directly accessible from other machines on your home network, which can restrict your ability to interact with these VMs from other devices.
Implementing the Solution
Here’s how to configure your VMs to be accessible within your network using Open vSwitch and QEMU/KVM.
Step 1: Setting Up Open vSwitch
- Install Open vSwitch:
sudo apt-get install openvswitch-switch
- Create a Virtual Switch:
sudo ovs-vsctl add-br vm_net
- Verify the Bridge:
Ensure your newly created virtual bridge vm_net is listed.
Step 2: Configuring Network Interface
We now link our network interface to the virtual bridge to allow VMs to communicate with the home network.
- Add Network Interface to the Bridge:
sudo ovs-vsctl add-port vm_net eth0
Replace eth0 with the correct identifier for your network interface.
- Check Configuration:
Make sure the network interface is correctly integrated with the bridge.
Step 3: Adjusting VM Network Settings
We need to ensure that the VMs utilize the Open vSwitch bridge for network communication.
- Update VM Network Config:
Adjust your VM’s network configuration to connect through the
vm_net bridge:
<interface type="bridge">
   <source bridge="vm_net"/>
   <virtualport type="openvswitch"></virtualport>
   <model type="e1000e"/>
</interface>
- Restart the VM:
sudo virsh start <vm-name>
Verifying the Setup
After these configurations, your VM should receive an IP address from your home DHCP server. Check the VM’s network details and try to ping the VM from another device in your network to ensure connectivity.
Conclusion
By integrating QEMU/KVM with Open vSwitch, you’ve overcome the NAT limitations, making your VMs fully accessible within your network. This configuration not only simplifies network management but also enhances the usability of your home lab.
If you prefer to consume this post as a video, I got you covered:
A year ago, I was exploring a few Kubernetes CNI plugins when I stumbled upon the Cilium project. Cilium uses eBPF and XDP for network traffic control, security, and visibility.
eBPF (Extended Berkeley Packet Filter) allows you to attach your code on the fly to almost any function within the Linux kernel. XDP (Xpress DataPath), on the other hand, enables manipulation of network traffic even before it reaches the network stack of the Linux kernel. Essentially, eBPF and XDP let you dynamically add logic to network traffic control while bypassing the kernel network stack potentially giving you better performance.
Although I initially considered utilizing these technologies to accelerate Kubernetes workloads using a DPU, a type of smart NIC, eventually I scrapped this XDP offload idea and went in a different direction, but the technology remained stuck in my head since then.
Fast forward to today, I decided to spend a weekend building a functional example that uses most of the basic building blocks of eBPF and XDP.
What the code does?
- User-space configures IP addresses to which the
ping command should be blocked; this configuration can be adjusted on the fly.
- User-space gets notified once ICMP traffic hits the NIC.
How?
- Utilize libbpf to abstract away many of the repeating eBPF boilerplate code, simplifying the process of writing, loading, and managing the eBPF program.
- Establish communication between the user-space code and the eBPF program.
- Utilize an eBPF ring buffer for communication where the XDP will be the initiator.
- Use an eBPF hash map allowing user-space code to dynamically define which IPs should be blocked.
Let’s break down the main parts of the eBPF code.
My personal setup at home includes several machines: a Windows 11 machine and a Linux based home server. Now while Windows 11 is perfect for web browsing and occasional gaming, the bulk of my time is spent writing and compiling code and Windows is not the ideal environment for that. This is where the “Remote SSH” plugin for VSCode comes in handy. It allows you to use your VSCode running on Windows as if It was running on your Linux machine.
Below are the required configuration steps:
- On you Windows machine, generate SSH key pair. Open PowerShell and run the following command:
ssh-keygen -b 4096
By default this will generate two keys under c:/Users/<user name>/.ssh/
Copy the public key [content of id_rsa.pub].
- On your Linux machine, run the following command to create authorized_keys file:
vim ~/.ssh/authorized_keys
Paste the public key from earlier step.
-
Install Remote SSH plugin for VSCode.
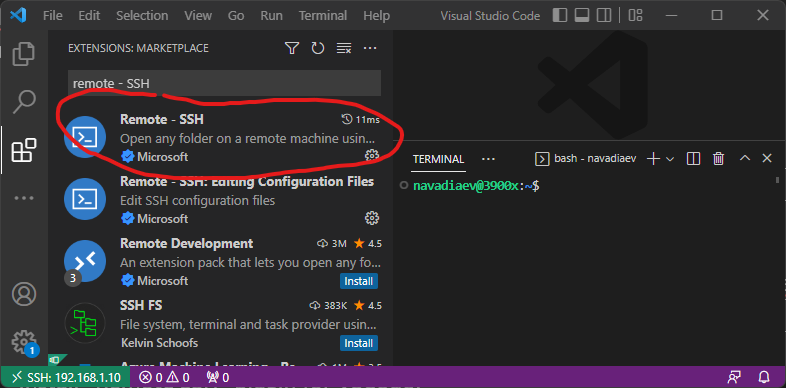
- To configure the plugin, click
ctrl + shift + p and type ssh config. Open the configuration file and fill it with the following [adjusted with your IP addresses and etc]:
Host 192.168.1.10
  HostName 192.168.1.10
  User navadiaev
  Port 22
  PreferredAuthentications publickey
  IdentityFile "C:\Users\nafta\.ssh\id_rsa"
- Click
ctrl + shift + p again and type connect to host.
You should be able to select the host you just configured and login.
Below is a video where I execute the above instructions:
In this short post I am going to explain how to setup an iPXE server with a DHCP proxy, meaning you will not need to configure anything on the existing DHCP server you have on the network. This comes especially handy when you can’t control/modify the existing DHCP server.
Lets dive into the setup instructions. In case you will want to understand a bit more how it all works, I will be uploading a youtube video which explains the configuration provided in this post.
- Install dnsmasq:
sudo apt-get install dnsmasq
-
Get ipxe from https://ipxe.org/download, you can get the source code and compile yourself or just download the precompiled binaries. You can also download all the files needed from link at the end of this post. The file you will need from this step is ipxe.efi, it needs to be placed in the root folder of your tftp server.
-
Download Ubuntu Live 22.04 ISO, from www.ubuntu.com and from the iso image retrieve /casper/initrd and /casper/vmlinuz files. Create folder “casper” at the root folder of your tftp server, and copy both of these files there.
-
You also should create grub/grub.cfg configuration file under your root tftp folder. This file is defines the boot menu you see once your iPXE client boots. Below is an example where we use our iPXE server to boot a Ubuntu ISO image from Ubuntu web servers:
menuentry "Install Ubuntu 22.04 (Pull the iso from web)" {
   set gfxpayload=keep
   linux   /casper/vmlinuz url=https://releases.ubuntu.com/jammy/ubuntu-22.04.1-desktop-amd64.iso only-ubiquity ip=dhcp ---
   initrd  /casper/initrd
}